Your cart is currently empty!
How To Install A Horizontal Lifeline
Horizontal Lifelines
Whether it’s on a rooftop or a construction site, working at height always demands the proper safety precautions. One of these precautions is fall protection, which comes in many forms. The type of fall protection we’re focusing on today is the horizontal lifeline system. We’ll be going over how to use and how to install a horizontal lifeline system.
Horizontal lifelines stand out for their ability to provide extended fall protection over long distances and for surpassing the user limitations of overhead anchor points. In this article we’ll be taking a look at the traverse horizontal lifeline system, the components that make it up, how to assemble it, and the benefits it provides over other fall protection systems.
Horizontal lifelines serve a critical role in fall protection plans. These systems can be found in many applications from rooftops to construction. Different systems are designed to be anchored to different materials and locations. Systems like the traverse horizontal lifeline can be used on both I-Beam and concrete, though there are some differences in how these materials are anchored to. Today we will be focusing on how the traverse horizontal lifeline is installed and used on an I-Beam.

The Components Of A Horizontal Lifeline System
The standard setup for a horizontal lifeline system utilizes four components.
Stanchion Posts
The stanchion posts are the backbone of I-Beam and concrete traverse systems. Made to securely anchor to I-Beams and concrete these posts can safely support users in the event of a fall.
The Cable Assembly
The cable assembly is made from galvanized steel and comes in lengths that can be customized to any job site. The cable assembly also features sliding connection rings that allow users to move along the system smoothly.
Coil Energy Absorber (CEA)
The CEA reduces the forces placed on the system as a whole during a fall. They are located on the cable assembly which connects to the stanchion post.
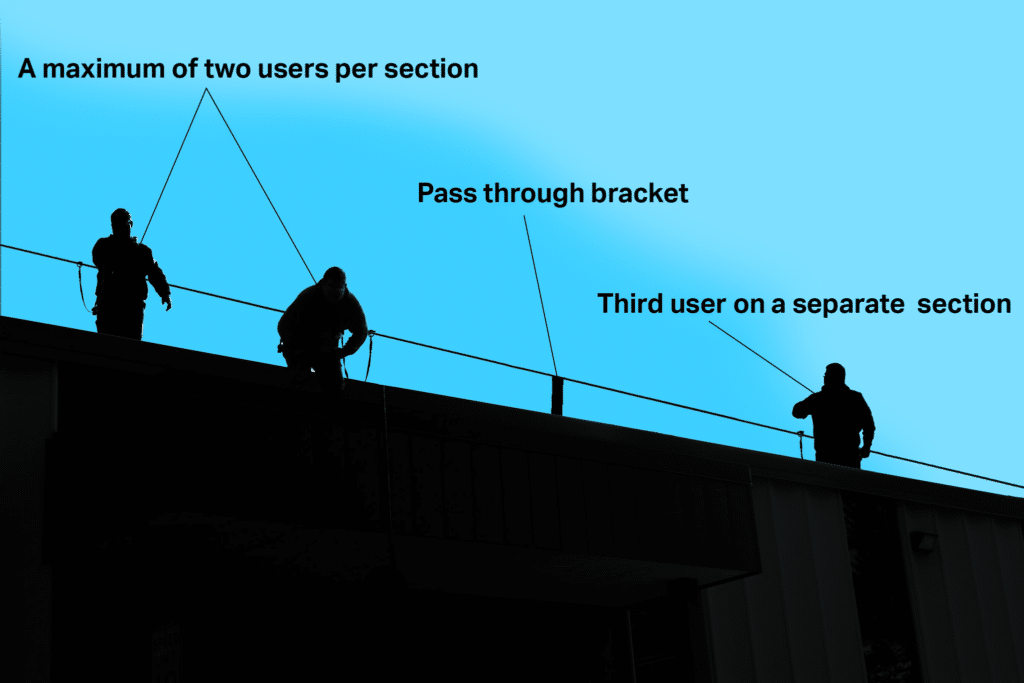
Pass-Through Bracket
Attached to intermediate stanchion posts, the pass-through bracket acts as additional support for lifelines greater than 60 feet in length.
I-Beam Setup Procedures
When setting up stanchions, it is advisable to connect them to I-beams at ground level to mitigate risks associated with assembling systems at height. The number of stanchions needed for a system is dependent on the total length that will be covered. For spans 60 feet and under only the two end stanchions are needed. Once a horizontal lifeline exceeds 60 feet additional pass-through stanchions are required.
It is important to ensure that the locations the stanchion posts are installed on are both capable of withstanding a fall and are the proper size for the stanchion base. Traverse stanchions are designed to fit I-Beams between 6 and 12 inches. Be sure that they are installed at the proper location.
Setting Up The Stanchions
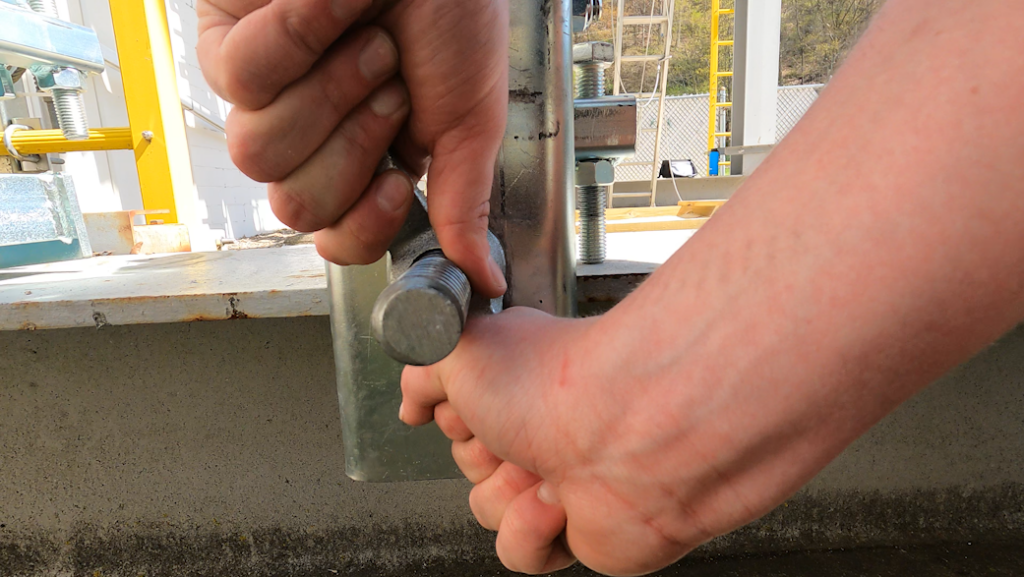
The stanchion posts attach to I-Beams with three heavy-duty bolts. Two of these bolts prevent the post from leaning and the third bold secures it directly to the I-Beam. When tightening the bolts ensure the stanchion post is level for a secure fit. The bolts can be hand-tightened to adjust the post and once it is in the proper position can be fastened into place with a wrench. A properly installed post won’t be able to move side to side.
Once the posts are in place the cable assembly can be attached. A carabiner on each end of the cable connects to the top of the stanchions. The cable assembly will have some slack to it which can be adjusted with the turn buckle. If you have a torque meter, 45 lbs. of force is a good point to tighten the lifeline to. If you have no means of directly measuring the tension of the lifeline a good way to determine if the line is taut enough is to check how far the center of the line drops down. The lifeline shouldn’t drop more than 2 inches below the height of its connection point to the stanchion.
The setup process for these lifelines is quick and easy but it is important to keep an eye on how the stanchions are positioned. All stanchion posts along the length of an I-Beam must be on the same side of the beam otherwise the system will impede user movement.
User Capacity
One of the biggest advantages provided by a horizontal lifeline system is that it can handle multiple users at once. Where most other fall protection options only protect one user at a time, horizontal lifelines can safely handle multiple users along the length of the system. The traverse system can accommodate up to 6 users provided that each span, or length between two stanchion posts, does not exceed 2 users.
Horizontal Lifelines In Summary
Understanding the components, installation, and usage of horizontal lifeline systems is key to remaining safe. These lifelines offer a fall protection solution for various work environments and are simple to implement and operate. To get a look at how these lifelines are installed, visit our YouTube channel to watch a short video covering the traverse horizontal lifeline.
Here at FrenchCreek Fall Safety, we get a lot of questions on how to use various fall protection systems. If you require information on the use of horizontal lifelines like the one discussed here, feel free to reach out to us so we can make sure you know what you need to do to stay safe.